Optimizing and exporting images is the process of taking a source file (filename.png) and flattening the layers and compressing it to be presented on the web. The benefit of this process is that it allows you to take large image files and make them smaller so they can be quickly downloaded from your site. This makes your site more usable and more accessible to all audiences.
Before you begin the optimization process, you need to decide on which format to use for your image. The two primary image formats are .jpg and .gif. Below are some good rules of thumb to help you decide which format to use.
- .jpg – Use this format for photographs or composite images that contain photographic images. You should also use this format when working with gradient-like variations in color.
- .gif – Use this format for graphics and vector shapes. This format also supports transparency.
- .png – Fireworks Default format / Portable Network Graphics
Optimizing and Exporting a .JPG
- Open the image you wish to optimize in Fireworks. Download Example Image
- If the Optimize Palette is not open, open it now by selecting Optimize from the Window menu
- Select the Preview view from the top of the document window. This is how the image will look when it is exported. You will notice in the bottom left-hand corner of the document window something that looks like this:

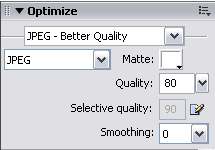
What this is telling you is that at the current optimization settings your image is 151kb in size and will take 24 seconds to download on a dial-up internet connection. This is entirely too big. You should aim to have your largest images in the 20 – 30kb range - In the Optimization Palette you should select the type of image that best suits your need. For this example I will use .jpg because this image is based off of a photograph. In order to adjust the size of the image, you should adjust the quality. What you are looking for is a balance between quality and size. As you reduce the quality the size will decrease.

- Once you have found the proper balance between quality and size you are ready to export the image. Under the File menu select export.
- When the Export dialog box opens, browse to the images folder located inside your assets folder, give the file a meaningful name (lower-case, no spaces), and press the export button.
- You are now ready to insert the image into your web page.
Optimizing and Exporting a .GIF
- Open the image you wish to optimize in Fireworks.
- If the Optimize Palette is not open, open it now by selecting Optimize from the Window menu
- Select the Preview view from the top of the document window. This is how the image will look when it is exported. You will notice in the bottom left-hand corner of the document window something that looks like this:

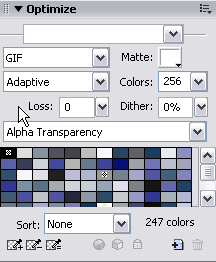
What this is telling you is that at the current optimization settings your image is 151kb in size and will take 24 seconds to download on a dial-up internet connection. This is entirely too big. You should aim to have your largest images in the 20 – 40kb range - In the Optimization Palette set the export format to gif. In order to adjust the size of the image, you remove colors and adjust the loss. What you are looking for is a balance between quality and size. As you reduce the quality the size will decrease. If you would like the image to be transparent set the Transparency option to Alpha Transparency. Set the Matte Color to the color the image will be place upon. I will place this image on a white background so I will set the matte to white as well.

- Once you have found the proper balance between quality and size you are ready to export the image. Under the File menu select export.
- When the Export dialog box opens, browse to the images folder located inside your assets folder, give the file a meaningful name (lower-case, no spaces), and press the export button.
- You are now ready to insert the image into your web page.
